Trace Sampling Strategies: Head vs Tail Sampling
On this page
Why traces need sampling
A service handling 5,000 requests per second, with 20 spans per request, produces 100,000 spans a second: billions a day. Storing all of them is usually unaffordable, and most are identical successful requests nobody will look at. Sampling decides which traces to keep.
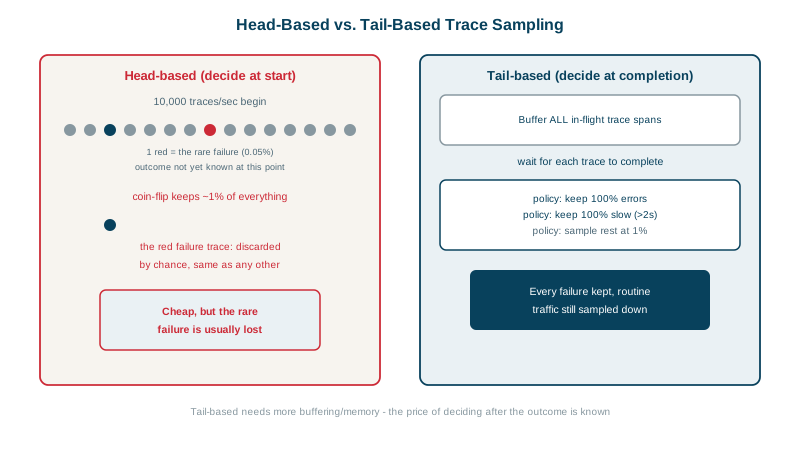
A sports picture helps. Head sampling is deciding before kickoff which matches to record: cheap, but you'll miss most of the dramatic ones. Tail sampling is recording every match and keeping only the ones with goals after the final whistle: you keep all the drama, but you have to record everything first.
Head sampling: deciding at the start
The first service decides when the trace begins, usually with a probability (keep 5%), and propagates the decision in the traceparent flags so every service agrees.
- Cheap and simple: unsampled requests create almost no overhead.
- Blind: the decision is made before anything happens, so it can't know which requests will fail or be slow. Errors are kept at the same 5% as everything else.
Tail sampling: deciding after the trace completes
Spans go to a collector, which waits until the trace is complete and then decides based on what happened. The lab collector's policies (validated with otelcol-contrib validate):
processors:
  tail_sampling:
    decision_wait: 5s            # wait for the whole trace before deciding
    policies:
      - name: keep-errors
        type: status_code
        status_code: { status_codes: [ERROR] }
      - name: keep-slow
        type: latency
        latency: { threshold_ms: 1000 }
      - name: sample-the-rest
        type: probabilistic
        probabilistic: { sampling_percentage: 5 }
A trace is kept if any policy matches. Sending it 2,000 synthetic checkout traces, 1% failing and 2% slow:
sent { error: 24, slow: 41, normal: 1935 }
kept traces by kind: {'normal': 96, 'error': 24, 'slow': 41} total 161
All 24 failures and all 41 slow traces were kept, plus 96 of 1,935 normal ones (5%). Overall it kept 8% of traces. A 5% head sample of the same traffic would have kept about one failure.
The cost of tail sampling
- Every span must reach the collector, so network and collector load are paid for all traffic.
- The collector holds traces in memory for
decision_wait; size it for your traffic. - All spans of a trace must reach the same collector instance. With several collectors, put a load-balancing exporter in front that routes by trace ID.
- Long or asynchronous traces may finish after the decision window.
Practical trace sampling strategies
- Head sampling at a moderate rate, plus always keeping errors by having services mark them (some SDK and collector setups support this), for simple systems.
- Tail sampling where errors and latency outliers matter and the volume justifies a collector tier.
- Different rates per endpoint: health checks at 0%, critical flows like checkout at 100%, bulk endpoints at 1%.
- Don't sample metrics: keep accurate RED metrics from all requests (Day 6), and generate span metrics before sampling, so rates and error ratios stay exact while traces are sampled.
- Record the sampling rate so tools can estimate true counts.
Check yourself
It decides at the start of the request, before anything has gone wrong, so error traces are kept with the same low probability as successful ones. At 1 percent sampling, 99 percent of errors are discarded.
The keep-errors policy evaluates each completed trace and retains every trace containing a span with an error status, so all 24 error traces survived regardless of the sampling rate for successes.
The keep or drop decision needs the whole trace, for example to see whether any span had an error. Split across collectors, each sees only part and may decide differently, leaving broken traces. A load-balancing exporter routes by trace id to prevent that.
The collector must buffer all spans of every trace until it completes, which needs memory and routing by trace id, and adds delay before traces appear.